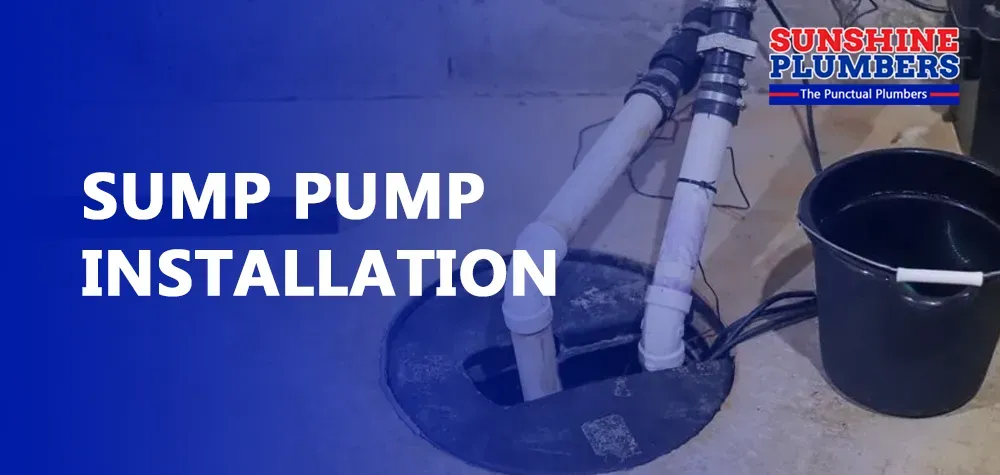
Sump Pump Installation
When it comes to protecting your home from water damage, a sump pump is an essential piece of equipment. But how do you go about sump pump installation? At Sunshine Plumbers, we understand the importance of safeguarding your property against flooding and water damage. In this expert guide, we’ll walk you through everything you need to know about sump pump installation, from the benefits and types of sump pumps to a step-by-step installation process.
Why Sump Pump Installation is Crucial
Sump pumps play a critical role in keeping your basement or crawl space dry by automatically pumping out water that accumulates in a sump basin. Here are some key reasons why sump pump installation is crucial:
- Prevents Flooding: Sump pumps efficiently remove excess water, preventing basement flooding during heavy rains or rising water tables.
- Protects Property: By preventing water accumulation, sump pumps help protect your home’s foundation, walls, and personal belongings from water damage.
- Reduces Mold and Mildew: A dry basement means less risk of mold and mildew growth, contributing to a healthier indoor environment.
Types of Sump Pumps
Before diving into the sump pump installation process, it’s important to understand the different types of sump pumps available:
1. Submersible Sump Pumps
Submersible sump pumps are designed to operate underwater, sitting directly in the sump basin. They are more powerful and quieter compared to pedestal pumps, making them suitable for larger basements with higher water volumes.
2. Pedestal Sump Pumps
Pedestal sump pumps have the motor located above the sump basin, making them easier to access for maintenance and repairs. They are ideal for smaller spaces where water accumulation is minimal.
3. Battery Backup Sump Pumps
Battery backup sump pumps are essential for ensuring continuous operation during power outages. They act as a secondary pump, kicking in when the primary pump fails or during electrical outages.
Step-by-Step Guide to Sump Pump Installation
Proper sump pump installation is key to ensuring optimal performance and longevity. Here’s a detailed step-by-step guide from Sunshine Plumbers:
Step 1: Gather Necessary Tools and Materials
Before starting the installation, make sure you have the following tools and materials:
- Sump pump
- Sump basin
- PVC pipe and fittings
- Check valve
- Gravel
- Silicone caulk
- Pipe wrench
- Hole saw
- Drill
- Tape measure
Step 2: Select the Installation Site
Choose a location in your basement or crawl space where water tends to accumulate. Ideally, the site should be near an exterior wall for easier discharge of water.
Step 3: Prepare the Sump Basin
- Dig the Pit: Dig a hole slightly wider and deeper than the sump basin. The basin should sit flush with the basement floor.
- Add Gravel: Place a few inches of gravel at the bottom of the pit to provide a stable base for the sump basin.
Step 4: Install the Sump Basin
- Position the Basin: Place the sump basin into the pit, ensuring it is level and stable.
- Seal the Edges: Use silicone caulk to seal the edges around the basin to prevent soil and debris from entering.
Step 5: Install the Sump Pump
- Position the Pump: Place the sump pump inside the basin, making sure it is properly aligned.
- Attach the PVC Pipe: Connect a PVC discharge pipe to the pump’s outlet port. Use a pipe wrench to tighten the connection securely.
Step 6: Install the Check Valve
- Cut the Pipe: Measure and cut the PVC pipe to the appropriate length to reach the discharge point.
- Attach the Check Valve: Install a check valve on the discharge pipe to prevent backflow of water into the sump basin. Ensure the arrow on the valve points away from the pump.
Step 7: Route the Discharge Pipe
- Drill a Hole: Drill a hole through the exterior wall for the discharge pipe.
- Route the Pipe: Run the discharge pipe from the pump to the outside of your home, directing it away from the foundation.
Step 8: Test the Sump Pump
- Fill the Basin: Pour water into the sump basin to activate the pump.
- Check Operation: Ensure the pump starts automatically and discharges water efficiently.
Tips for Maintaining Your Sump Pump
Regular maintenance is essential for keeping your sump pump in good working condition. Here are some tips:
- Inspect Regularly: Check the pump and basin for debris and clean as necessary.
- Test the Pump: Periodically test the pump by pouring water into the basin to ensure it operates correctly.
- Check the Backup: If you have a battery backup pump, make sure the battery is charged and functional.
Sump pump installation is a vital step in protecting your home from water damage and maintaining a dry, healthy basement. By following this expert guide from Sunshine Plumbers, you can ensure a successful installation and long-term performance of your sump pump. For
professional sump pump installation or maintenance services, contact Sunshine Plumbers today. Our team of experienced plumbers is here to help you safeguard your home against water damage.